
Rate limiters are foundational to modern system design, acting as gatekeepers that protect services from abuse while ensuring fair resource allocation. Whether managing APIs or large-scale distributed systems, implementing an efficient rate limiter can protect resources and maintain performance under high load. This blog dives deep into the concept of rate limiting and focuses on why these systems work and how to choose the right approach for your use case.
What is Rate Limiting?
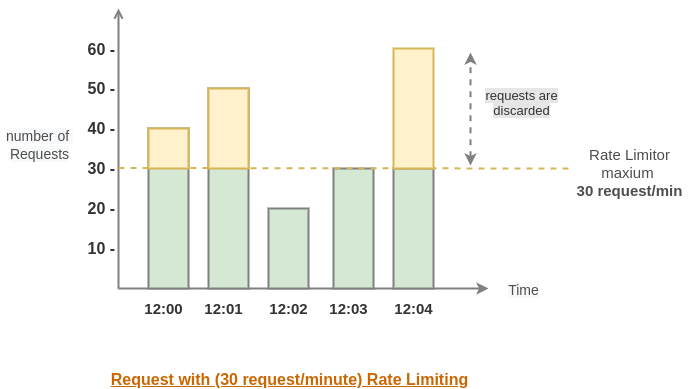
Rate limiting is controlling the number of requests or actions a system processes within a set timeframe. This ensures resources are not overwhelmed and all users get fair access. The mechanism acts as a gatekeeper, allowing only a defined number of actions per user, client, or IP address over a specific duration.
Why Rate Limiting Matters
- Resource Protection: Prevents system overload and ensures consistent performance.
- Abuse Prevention: Stops excessive or malicious usage, such as brute-force attacks or scraping.
- Fairness: Ensures equitable distribution of resources among users.
- Reliability: Maintains predictable response times during traffic surges or heavy usage periods.
Where is Rate Limiting Used?
- APIs: To prevent abuse and ensure backend services aren’t overwhelmed.
- Authentication Systems: To limit repeated login attempts and mitigate brute-force attacks.
- Web Scraping: To control data access and ensure compliance with usage policies.
- Distributed Systems: To synchronize operations and avoid congestion across nodes.
How Rate Limiting Works
Key Metrics
- Request Count: The maximum number of requests allowed within a specific time frame.
- Window Duration: The time interval over which requests are counted.
- Burst Capacity: Additional allowance to accommodate short-term traffic spikes.
- Throttle Duration: The period during which requests are denied after the limit is exceeded.
Rate Limiting Algorithms
1. Leaky Bucket
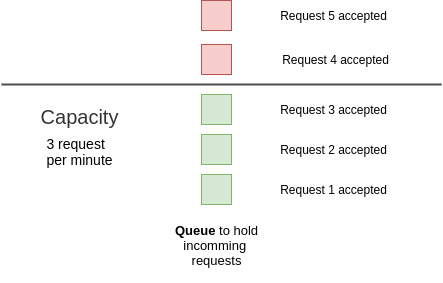
It is the simplest algorithm to implement a rate limiter. It uses a bucket or queue to hold the incoming requests. Whenever a new request arrives, it is appended to the rear of the queue, until the queue is not full.
The requests are processed at fixed time intervals in the first come first serve (FCFS) manner, i.e. old requests are the ones to be executed first. If the queue is full, the remaining are dropped or leaked with a proper message or notification to the client.
- Pros:
- It smoothens the burst of requests by processing them at a constant rate.
- Easy to implement.
- The size of the queue(buffer) used will be constant, hence it is memory efficient.
- Cons:
- Boundary issues may lead to temporary overloads.
- It provides no guarantee that requests will be processed in a fixed amount of time.
2. Sliding Window
It is based on a fixed window algorithm. Here instead of completing the counter after every window, we use the information from the previous counter to estimate the size of the current request rate for the current window.
In the sliding window, instead of a fixed window size, we have a rolling window of time to smooth bursts.
The windows are typically defined by the floor of the current timestamp, so 12:03:15 with a 60-second window length would be in the 12:03:00 window.
Let’s say we want to limit 100 requests per hour on an API and assume there are 84 requests in the time window [12:00–1:00) and 36 requests current window [1:00 to 2:00) which started 15 minutes ago.
Now imagine a new request arrives at 1:15. To decide, whether we should accept this request or deny it will be based on the approximation.
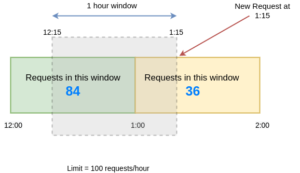
The approximation rate will be calculated like this:
limit = 100 requests/hour

rate = 84 * ((60-15)/60) + 36
     = 84 * 0.75 + 36
     = 99

rate < 100
    hence, we will accept this request.
Since the requests in the current window [12:15–1:15) are 99 which is less than our limit of 100 requests/hour, hence this request will be accepted. But any new request during the next second will not be accepted.
This algorithm assumes a constant request rate in the (any) previous window, which is not true as there can be request spikes too during a minute and no request during another hour. Hence the result is only an approximated value.
- Pros: Provides smoother rate control.
- Cons: Slightly more complex to implement due to continuous tracking.
3. Fixed Window
Fixed window rate limiting algorithm, the timeline is divided into a fixed window(say 1 minute or 1 hour, etc.) and each window is provided with a counter(to count several requests in a particular window). If the value of the counter exceeds the limit, the remaining requests are dropped.
The counter resets after every window.
Suppose we have a rate limit of 10 requests/hour and have a data model like below.
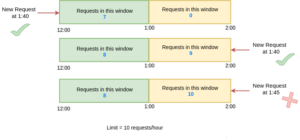
With the current method in the above example, if a new request arrives at 12:40, we get the count from the bucket(12:00–1:00) which is 7, and if less than our request limit, hence this request will be processed and count of the current window will become 8.
Now assume a case for window (1:00–2:00), a request arrives at 1:40 and the value of the counter in this window is 9, which is less than the permissible limit(10), so this request will be accepted and the value of the counter will become 10. Now no more requests in the window (1:00–2:00) will be accepted.
Pros:
- It is easy to implement.
- Less memory requirement since we are storing the only count in a given time window.
- It ensures more recent requests get processed without being starved by old requests (as the counter resets after every window)
Cons:
- A single burst of traffic that occurs near the boundary of a window can result in twice the rate of requests being processed. Suppose, that the counter is empty 10 requests spikes arrive at 12:59, they will be accepted and again a 10 requests spike arrives at 1:00 since this is a new window and the counter will be set to 0 for this window. So even these requests will be accepted and sever is now handling 20 requests> 10 requests/ hour limit.
- Many consumers waiting for a reset window(ex during peak hours like black Friday sales) can stampede our server at the same time.
Designing a Rate Limiter
Step 1: Define Requirements
Begin by identifying the resources that need protection and defining usage thresholds. For example, you might decide to allow standard users 100 requests per minute.
Step 2: Choose the Right Algorithm
Select an algorithm based on your use case. If your system needs to handle bursts effectively, a Token Bucket approach might be suitable. For stricter, steady-rate requirements, the Leaky Bucket algorithm can be a better choice.
Step 3: Storage Considerations
- In-Memory Storage: Use solutions like Redis or Memcached for low-latency storage. These are well-suited for single-node applications.
- Distributed Systems: For scalable, multi-node setups, consider partitioned or replicated storage to maintain state consistency.
Step 4: Monitoring and Logging
Implement monitoring tools to track rate-limiting metrics and log events where limits are exceeded. This helps identify patterns and anomalies in traffic.
Step 5: Testing and Optimization
Simulate real-world traffic conditions to validate your rate limiter’s thresholds. Use stress-testing tools to ensure that the system behaves as expected under peak loads.
Challenges in Rate Limiting
- Distributed Systems: Maintaining consistent limits across nodes in a cluster can be challenging.
- Latency: Minimizing the additional overhead introduced by rate-limiting checks.
- Storage Overhead: Efficiently managing state for a large number of users.
- Bypass Attempts: Ensuring that users cannot circumvent rate limits through proxies or other methods.
Best Practices
- Graceful Failures: Provide meaningful feedback (e.g., HTTP 429 Too Many Requests) when users hit rate limits.
- Dynamic Limits: Adjust thresholds dynamically based on user behavior or application context.
- Caching: Use in-memory storage for low-latency operations.
- Audit Trails: Maintain logs of rate-limiting decisions for debugging and compliance purposes.
Conclusion
Rate limiting is a fundamental aspect of resilient system design. By understanding the various algorithms, challenges, and best practices, you can create systems that are not only secure but also scalable and user-friendly. Although the implementation details can vary, the core principles remain consistent across different applications. Whether it’s protecting APIs or managing distributed systems, effective rate limiting can be the difference between stability and chaos.